Clean again so the pretties are coming back out to play. One of the questions I regularly ask during fittings is the growth pattern of the dancer or the possible range of sizes of dancers for a role. Where this is potentially large for a tutu, I will always recommend a lycra based tutu as hiding growth in something as fitted and technical as a tutu can be an issue but sometimes that isn’t possible. Thus, my job as a designer and builder of costumes is to try to ensure enough growth room for the life of the costume, whatever that may be.
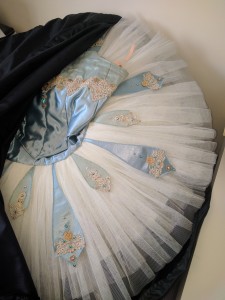
T16/02 is back for a rebuild. We have already lengthened the tutu by 3.5″ (thus a girth change of 7″). Now she has grown across her widths. The smallest change is by 2″ but the largest is 4″. She can get it on and closed but cannot bend to her toes. Can we sort it out? Since it is one of mine, I know we can. I also have been asked by others over the years how to modify a tutu. I hope the owner of this beauty doesn’t mind me documenting the let out for other people who may have to do the same alterations.
Step 1: What do you need to do and can you do it? We need to take this out by up to 4″. All the places which need taking out have enough spare fabric. If we didn’t we would need to add pieces with exact fabric matches or reduce seams to gain enough fabric. I always keep a record of every fabric used but that doesn’t always mean a perfect match is available, even to me! This large change will also have other knock on affects which I will note as I do them. I have the spare to do this too.
Step 2: Unpick the hooks and eyes No matter if they are tape or individual, unpick and clean the lose threads. If you have access to a stitch ripper use it carefully, otherwise small, sharp scissors will do. If you are in a hurry (dancer needed on stage) think about only removing one side if you can get away with it or only removing the hooks and eyes you need to move. If you have lots of spares you may just be able to add new rows in depending on construction techniques.
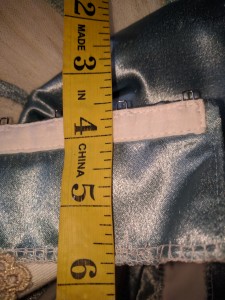
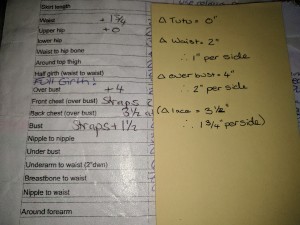
Step 3: Basic mathematics In our case we need an extra 2″ at the waist, 3.5″ at lace and 4″ at top. Split these by 2. Now mark these halved differences away from the fold line if you have one or the previous sewing edge if not.
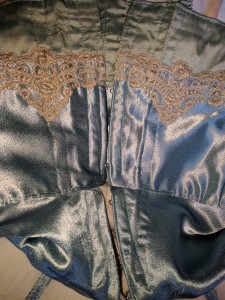
Step 4: Prepare for sewing Between these points fold the fabric again to create a new edge. Pin (and tack if needed) the hooks and eyes back to their new position. Be careful that they are in the same position with respect to the edge as they were previously. In my case the hooks are 3/8″ from the edge and the eyes lined right up to the edge. Also ensure that the hooks and eyes line up. Best way to do this is to pin one, fix the two together, line up the pieces then pin across before unfixing the two halves to finish pinning.
Step 5: Resew If you have a machine and are confident in its use, use a machine. Take the time to position the tutu correctly, to check your needle, foot, threads and settings. If you do not have access to a machine or you feel unsafe using it (now is not the time to try the machine you have wanted to. Positioning and avoiding breaking needles on metal is enough of a hassle for someone confident with their machine) sew by hand. You want to ensure the hooks and eyes are strongly affixed through all layers of backing fabric (often a twill or coutil but may be as thin as a polycotton in some examples I have seen). Stabbing motions will be fine. If you are not a confident sewer just stab through the layers many times in and around the metal, ensuring you cross the metal many times. If you tug and the whole tutu moves it is strong enough. Tie off and move to the next. Even with hooks and eyes on tape. An over hand stitch fixing the tape to the backing fabric will do after the hooks and eyes are secured.
Step 6: Fix everything else So in this case I had a few extra issues. Again if you are in a rush you can do these once the dancer is back off stage in most cases. The alteration at the waist was so big I had to further sew the bodice to the basque along the waist stay to ensure the waist stay did not show when the dancer bends forward. I do a back stitch. The straps had to move and be lengthened. I unpicked the stitching and moved them, ensuring I sewed two lines through the backing fabrics for safety sake of one line going onstage (never yet happened to me but…). The basque alteration was on an angle which lengthened the seam such that my tape was not long enough. I kept the tape low and added a separate hook and eye to the waist tape as my spare hook and eye was stronger. If it was weaker or I needed to leave a gap due to time constraints I would have put the gap below.
-
- Check that you have enough fabric
-
- Unpick and clean the tutu
-
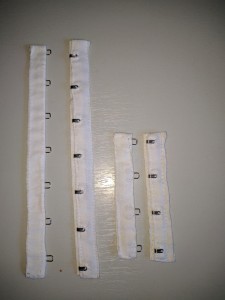
- Unpick and clean the hooks and eyes
-
- Dividing by 2
-

- Adding the extra from the fold line
-
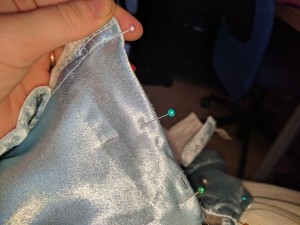
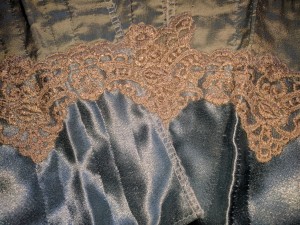
- Creating a new fold edge between our extra markers
-
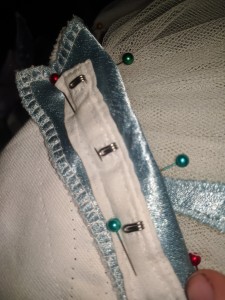
- Pinning the tapes ready for resew
-
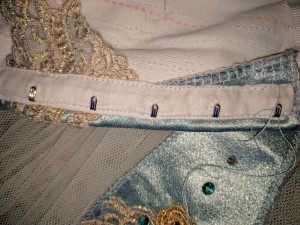
- Off the machine. Time to do everything else
-
- Completed
So for everyone out there who finds themselves having to increase or decrease width of a tutu at the back in the basque and bodice I hope this guide helps you feel more confident in moving the hooks and eyes. The old fold and sewing lines will decrease with time and also will be significantly less noticeable anyway on stage as opposed to on my floor. The more shiny the fabric, the more likely it is to show these more. Note I haven’t mentioned the tutu pants and how to alter them. If your resize includes the high hip seam or lower you will have to get individual advice as it is sometimes unadvisable to change this area. Time to pack T16/02 away for transport back to her owner. Enjoy!